Windows 365 Enterprise – Hybrid Join

Deploy Windows 365 Enterprise Hybrid with in depth info about hybrid joining devices

Blog series

In the previous article we deployed Windows 365 cloud pc Azure AD only. In this article we will deploy a cloud pc as Hybrid join. So what is hybrid join? Hybrid joining the machine joins the machine to both the Azure AD as well as the Active directory. When would you choose for a hybrid join set up? There are a couple of scenarios when you would want to choose for a hybrid set. For example you are still highly relying on configuring your devices with Group policies, or you have some legacy application that require machine authentication, or you want to use the hybrid join option in your Conditional access policies. All are valid reasons to use hybrid join. In my opinion Azure AD joining is preferable because it eliminates some moving parts in your configuration. These parts can break time to time so not having them will make your life easier.

When you hybrid join a machine the machine is first joined to the Active Directory and then synchronized to Azure AD. This is done via a certificate. AAD connect by default does not synchronize the certificates and therefor you need to adjust AAD connect for hybrid join.

Configure AAD Connect

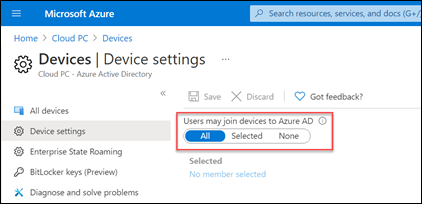
So, the first step is to configure hybrid Join in AAD connect. Open AAD connect and select Configure device options. You will see an overview screen where you can select Next. Enter your Azure AD global administrator credentials. Select Configure Hybrid Azure AD Join and Next. Then you select Windows 10 or later domain-joined devices and select Next.  You now need to add the SCP configuration. This SCP contains information for the device about where to look for its information as it needs to be joined to Azure. Here you select your forest, authentication service which is most likely Azure Active Directory and select add to enter your enterprise admin credentials. When you hit next some final validations will be done and finally you can choose Configure. Later I will show how to validate the Hybrid Join and what process actually got into motion. Also, if you are planning to deploy the cloud pcs in a specific OU make use the OU is also in sync scope. The OU needs to syn the attributes to Azure AD.

Add the SCP configuration

Azure Network Connection

Now AAD connect is ready you can configure Windows 365 for hybrid join. In order to do so go to endpoint.microsoft.com and choose devices and Windows 365. There you select Azure network Connection.

On the tab select create and choose Hybrid Azure AD Join. Enter a name which tells you something about the connection, for example what the vnet is you are connecting to. Select the subscription that has the vnet and select the subnet you want your machines to join to. It’s important that your vnet is in the same region as where you want to deploy your cloud pcs as vnet are bound to a specific region. Select next and create the connection. Make sure your account has the appropriate permissions on the subscription (Owner) and within Endpoint manager.

Azure network connection

With Hybrid join you need to add additional domain information. Enter the AD DNS name, optional the OU where the devices should be joined into (make sure this OU is syncing to Azure AD), and credentials of a user which has sufficient rights to join multiple pcs.

Azure network connection, domain settings

Microsoft will start running some checks and if all went well, you will get a checks success status. Note that you can have both join types of Azure AD and Hybrid Join pointing to the same vnet and subnet.

Combine join types

Provisioning policies

The next step should be creating a Provisioning Policy. These policies determine how the Windows 365 pc should be created. From the Devices section select Provisioning policies and select create policy. Enter a name and description. For Join type make sure to select Hybrid Azure AD Join. So, choose for Azure network connection and select the hybrid network connection you just created in the previous step.

hybrid join provisioning policy

At the image tab pick a gallery image, or a custom image if you have one. Check this article if you’re interested in how to create a custom image. At the configuration tab select the language and region. This will automatically install the required language packs on the machine. For additional services you may choose Windows Autopatch. Windows Autopatch manages updates for you. It’s not really a Window 365 services but you can read more about it in this blog Blog | Get current and stay current with Windows Autopatch | Tech Community (microsoft.com)

Finally assign the policy to a group which contains your users. When you have finished creating the provisioning policy you are basically set. When a user has a valid license (a Windows 365 enterprise and a license containing Intune) and is a member of the group which is assign the provisioning policy the cloud pc will be created.

Now I assign the following licenses to my test user in order to start the provisioning of the device. My test user Mickey has 2 licenses: a Microsoft 365 E3 and the Windows 365 Enterprise 2 vCPU, 8 GB, 256 GB license.

Hybrid Join

So how is a device hybrid joined? This process is pretty interesting and does not only apply to Windows 365 but also to normally hybrid joining clients. Hybrid joining set a scheduled task in motion. You can find the scheduled task in \Microsoft\Windows\Workplace Join called Automatic-Device-Join, which is triggered from in this case an event Microsoft\Windows\User Device Registration\Admin.  The scheduled task calls upon dsregcmd.exe. One of the first steps in this process is for the computer to create a userCertificate.

User Certificate on computer object

This certificate is then uploaded to Azure AD. This is why you needed to reconfigure AAD connect for this process to work. Without the certificate the device won’t synchronize with AAD.

AAD Connect synced attributes

Sometimes the hybrid join process won’t kick off, you can manually start the process by running the scheduled task (\Microsoft\Windows\Workplace Join\ Automatic-Device-Join) or by running dsregcmd /join from PowerShell.

Also verify that the pc shows up as hybrid joined in the endpoint manager portal.

Hybrid Joined Cloud PC

Windows 365 Enterprise- Custom Images

Step by step creating and capturing a custom image for Windows 365 Enterprise

Blog series

Introduction

Windows 365 Enterprise has a great integration with Endpoint manager. So, your configurations and app deployment should primarily come from there in my opinion. But in some cases, not everything that you need to configure can be (easily) done with Endpoint manager. Sometimes you run into an installation or configuration that is just really hard to accomplish with just Endpoint Manger. An example could be installing language pack (although this process is now included in the provisioning policies). But I’m sure there are other examples out there. This leaves you no other choice than to create your own custom image and use that image to be deployed to your users. In this blog I will walk you through the steps into creating a custom Image.

Prepare your Master Image

First step is to create a new Virtual Machine in Azure. It’s important that for your image you search and select a Windows 10/11 Cloud pc. Other important steps are that you connect your VM to a network you to which you can connect, and you want to disable any boot diagnostics or monitoring options.

Install apps and configurations

Now please consider the following. When you run sysprep the machine won’t be able to start again. This means that if you want to save your master image to make some changes later on you will have to reinstall and configure all your settings again. In order to save your master image for future adjustments is best that you clone your master image VM and sysprep the clone. This way the original master image will be saved for future adjustments. If you want to save your master image vm for future use you can follow along, otherwise skip straight to the sysprep section.

Clone your VM

1 Shutdown your master image vm, until a deallocated state.
2 Create a snapshot of the disk
2a Go to your master image VM
2b Select Disks

Snapshot disk

2c Select the OS disk
2d Select Create Snapshot

Create snapshot of disk

2e Now most settings you can leave as default. I would set storage type to standard HHD

3 Create a new disk from the snapshot
3a Go to your newly created snapshot and select create disk

Create disk from snapshot

3b Here you can also leave all the defaults as is. Make sure that you select the same disk size as you original VM. By default, the size if 128 GB.

Create managed disk

4 Create a new VM from that new disk
4a Go to the newly created disk. From this disk you can now create a new Virtual Machine

Create vm from managed disk

4b Use the same settings as when you created the original Virtual Machine, the only difference should be the image, which should be your created disk.

Sysprepping and capturing your image

Now your master image VM is ready to sysprep. You have created a clone, or you used the original VM the next steps are to sysprep your machine and to create an image from that machine. So, connect to your VM. Navigate to C:\Windows\System32\Sysprep and start sysprep.exe. Use the following setting:

  • System Cleanup Action: Select Enter System Out-of-Box Experience (OOBE) to configure the behavior on startup
  • Select Generalize
  • Shutdown Options: Select Shutdown
Sysprep

After some time, the machine will disconnect. Wait until the machine is in a stopped state in the Azure Portal. When it’s in a stopped state you can select Capture.

On the create image screen it’s important to select No, capture only a managed image. Azure Compute Galleries are not supported. Give your image an easy to recognize name. Also, it’s easy to select Automatically delete this virtual machine after creating the image since the machine won’t be able to function after the sysprep and capture procedure.

Caputre image

When everything went successfully you end up with an image.
Its best to test the image by creating a new VM from this image and validate if the image works as expected.

New image

Add image to Windows 365

After you have validated the image you can add the image to Windows 365. Go to endpoint.microsoft.com and navigate Devices > Windows 365 > Custom images and select Add.

Give your image a name and a version, select the subscription where you saved your image and select the image you created.

Add image

The image will now be uploaded to the Windows 365 services. This process can take a while to complete. After the image has been successfully uploaded you can use the image in your provisioning policy. Instead of choosing a marketplace image your select custom image and you should be able to find your newly uploaded image.

Custom image in provisioning policy

This was the final post of the Windows 365 blog series. I hope the information was useful and you were able to follow the steps.

If you mis any information, please let me know and I will try to incorporate the information into the blog series.

Getting started with Windows 365 Business

Step by step deployment instructions of Windows 365 Business

Please read my introduction blog, Starting with Windows 365 if you are looking for Windows 365 basic information.

Blog series

Windows 365 Business – Prerequisites

In order for Windows 365 Business to work you will need to enable the ability for users to join devices to the Azure AD. You can enable this by going to portal.azure.com selecting the Azure Active Directory and then Devices and Device settings. Here you can select All, or scope it to a group of users.

Users may join devices to Azure AD

Before assigning any licenses its good to set the organization default settings. Here you can choose whether a user should be a standard user or local administrator, what operation system should be deployed and the language. These settings are only deployed when assigning a new cloud pc. You can also those to enroll the new devices into Microsoft Endpoint Manager, but your user will also need a separate Intune license. You can modify these settings my signing in to https://windows365.microsoft.com/

Update organization settings

Select Update organization setting:

Update organization settings

In my case I also enroll new cloud devices in Endpoint Manager since I have a suitable license.

Assign your user with a license

My test User Goofy is a user who is synced from Active Directory with AAD Connect to Azure AD. You do not need a synchronized user, a cloud only user is also fine. I’m assigning Goofy a Microsoft 365 Business Premium license. This includes Intune so I can manage the device. I’m also assigning the Windows 365 business 2 vCPU, 8 GB, 128 GB license. By assigning the Windows 365 license Microsoft immediately starts provisioning a new cloud pc for the user. This process does take some time to complete. You can monitor this process by selecting the user and by selecting Devices:

Cloud pc is provisioning

After some time you will see that the device is ready for the user to work with:

Cloud PC is ready

Since I also selected the option to enroll the device into Intune you can also find the device there.

Cloud PC in Endpoint manager

End user experience

When the user sings into Windows 365 (microsoft.com) they will see the first launch experience:

The user can then launch the Cloud pc

The user can also use the remote desktop application. If possible, I would recommend using the app, because it has better performance than the browser. The user can download the app from the Microsoft Docs.
Open the application and select subscribe and sign in with your credentials

You can now also use the new Windows 365 app which has been announced at Ingite 2022.

Managing Windows 365 Business

As an administrator you would want to administer the device. You have a couple of options. If you have enrolled the device into Intune then your options are limited. When selecting the user in the windows365.microsoft.com portal you have a couple of options:

Managing the device with Intune

Since the device is enrolled with Intune we can also push configurations to the device. I did notice some differences with enrolling normal clients into Intune. There also seem to be some differences with the Windows 365 Enterprise. When opening the device overview in Intune.

There seems to be no primary or enrolled by users, and the device model is stated Virtual Machine. If you compare this with an Windows 365 Enterprise enrollment you see that the primary user and the device model is stated

The lack of an primary user isn’t really an issue, the reason for this is properly that Microsoft uses a different enrollment process like a build enrollment token to enroll the device. The other difference doesn’t seem big until you want to create custom filter rules Create a filter for your Cloud PCs | Microsoft Learn. This option can be useful when you want to target specific Windows 365 cloud pc’s in your environment. Unfortunately this option is not available.

Otherwise, all options that you can use for managing your devices is also possible with Windows 365 business. You can deploy apps, and configurations to your devices as your company requires.

Deploy Dropbox as a Win32 App with Intune

Package Dropbox as a Win32 app to deploy it using Microsoft’s Intune

Dropbox is a widely adopted platform to save and share your documents. Although Microsoft’s OneDrive may be the most logical choose when using Microsoft products there still are companies actively using Dropbox as their cloud file storage solution. In this blog I will share how to deploy the Dropbox client in your organization by using Intune. This is what you need:

On your PC create a new folder. The folder will contain three files: The Dropbox installer you downloaded and you create 2 additional files, an install.cmd and an uninstall.cmd file.

For the install.cmd you use the following lines:

@ECHO OFF
PUSHD "%~dp0"
"Dropbox 139.4.4896 Offline Installer.exe" /NOLAUNCH

You can validate the command by running the install.cmd as an admin.

For the uninstall.cmd file you use the following lines:

@ECHO OFF
"%PROGRAMFILES(x86)%\Dropbox\Client\DropboxUninstaller.exe" /S

Also on your machine take a look in the registry which version is installed. Apparently the version that the installer states is different than what is found in the registry. You can check the version in Computer\HKEY_LOCAL_MACHINE\SOFTWARE\WOW6432Node\Dropbox\Client

Now that you have prepared the files its time to wrap them into a intunewin file.

  • Source folder: specify the files which contains your installation files
  • Setup file: is the Dropbox offline installer files
  • Output folder: a folder where you want to save the intunewin file. Choose a different location than your source folder
  • For catalog folder choose no

Now that you have prepared Dropbox its time to deploy it via Intune. Follow this link to get to Windows Applications  https://endpoint.microsoft.com/#blade/Microsoft_Intune_DeviceSettings/AppsWindowsMenu/windowsApps

Choose Add and for App type Windows app (Win32). For package file select your Dropbox intunewin file. Fill out the required app information and choose next.

At the second step for the install command enter install.cmd and for the uninstall command choose uninstall.cmd. The install behavior should be set to System.

At the requirements choose the system architecture and a minimal operating system version. The fourth step is the detection rules. For Rules format choose Manually configure detection rules:

  • Rule type: Registry
  • Key path: Computer\HKEY_LOCAL_MACHINE\SOFTWARE\WOW6432Node\Dropbox\Client
  • Value name: Version
  • Detection method: Version comparison
  • Operator: Equals
  • Value: 139.4.4896 ( or whatever value you installed)

Finally assign the application to a user or computer group, and wait for the installation to take place.

Hope this blog was helpful, if you have any questions feel free to post them in the comments.

Deploy Zoom as a Win32 App with Intune

Deploy the Zoom client and the Zoom Outlook plugin using the Win32 app format in Intune

In this article I will show you how to can deploy Zoom as a Win32 app using Microsoft’s Intune. When following the guidelines from Zoom, they only show you how to deploy Zoom by using the Line-Of-Business method. Although this works you get much greater flexibility when deploying Zoom as a Win32 app. You can make use of delivery optimalization and better targeting to for example only 64-bit operating systems and more. Furthermore, when you want to deploy new clients via Autopilot you cannot mix line-of-business installations with Win32 app installations. So I would always be my recommendation to use the Win32 app deployment.

You need:

Personally I always like to work with and install.cmd and a uninstall.cmd to deploy my applications. You can however just repackage the msi installer and use the commands in the installation parameters in Intune. When using the install.cmd and uninstall.cmd files I can be more flexible when I need to copy files for example.

Copy the ZoomInstallerFull.msi to an empty folder. Create two new files in the folder named install.cmd and uninstall.cmd. The Zoom msi comes with a variety of installation parameters to customize your deployment as needed. You can for example disable auto update and to configure the required firewall ports. You can also use zConfig to set configurations that cannot be changed or use ZRecommend to make settings users can change. In my example I use the following installation command, which is the command in the install.cmd file:

msiexec /i "%~dp0ZoomInstallerFull.msi" /norestart /qn ZConfig="nogoogle=1;nofacebook=1;" ZoomAutoUpdate="false" FirewallPortStart="7200" FirewallPortEnd="17210"

You can test your install.cmd by running it as an administrator. For the uninstall.cmd you use the following command:

msiexec  /x {51AFD52B-0614-4100-91E0-204AC1EF0A3B}

You can find the GUID for the application in the registry HKEY_LOCAL_MACHINE\SOFTWARE\WOW6432Node\Microsoft\Windows\CurrentVersion\Uninstall\{51AFD52B-0614-4100-91E0-204AC1EF0A3B}

You now should have a folder containing ZoomInstallerFull.msi, install.cmd and uninstall.cmd.

Zoom installation folder

Start the Win32 Packaging tool and enter the following parameters:

  • The location of your source folder containing the ZoomInstallerFull.msi, install.cmd and uninstall.cmd.
  • The setup file is ZoomInstallerFull.msi
  • Create a new output folder where you want to save the new package.
  • Select no for creating a catalog folder
Zoom Win32 packaging parameters

To deploy the application with Intune go ahead and add a new application and for app type choose Windows app (Win32)

On the App information page, provide the Naam, Publisher, app Version and whatever information you want to share. At the program page use install.cmd for the installation command and uninstall.cmd for the uninstall command. For install behavior make sure to select system. Finally select No specific action for device restart behavior.

Zoom installation parameters on Intune

At the Detection rule page I like to use the version number to detect if the application is installed. I you want to deploy an other version in the future you can use the Supersedence option which makes detecting on a specific version easier.  So fo the Detection rules choose Manually configure detection rules:

  • Rule type: Registry
  • Key path: HKEY_LOCAL_MACHINE\SOFTWARE\WOW6432Node\Microsoft\Windows\CurrentVersion\Uninstall\{51AFD52B-0614-4100-91E0-204AC1EF0A3B}
  • Detection method: Version comparison
  • Operator: Equals
  • Value: 5.9.2481 (or whatever version you are deploying)
Zoom detection rules Intune

Finally deploy the application to a group in your organization.

To install the Zoom plugin for Microsoft Outlook you can use the same procedure. Create a folder which contains: ZoomOutlookPluginSetup.msi, install.cmd and uninstall.cmd.

Install.cmd

msiexec /i "%~dp0ZoomOutlookPluginSetup.msi" /norestart /qn

uninstall.cmd

msiexec /x "{BC6BA982-1260-4284-8B1F-68184984021B}" /q

Start the Win32 Packaging tool and enter the following parameters:

  • The location of your source folder containing the dp0ZoomOutlookPluginSetup.msi, install.cmd and uninstall.cmd.
  • The setup file is dp0ZoomOutlookPluginSetup.msi
  • Create a new output folder where you want to save the new package.
  • Select no for creating a catalog folder

Deploy the package using Intune using the same options as for the Zoom client. For detection rules use:

  • Rule type: Registry
  • Key path: HKEY_LOCAL_MACHINE\SOFTWARE\WOW6432Node\Microsoft\Windows\CurrentVersion\Uninstall\{BC6BA982-1260-4284-8B1F-68184984021B}
  • Detection method: Version comparison
  • Operator: Equals
  • Value: 5.9 (or whatever version you are deploying)

Hopefully you found the article informative. I you have any question or comments feel free to use the comments section below.

Deploy Acrobat Reader DC with Intune

Use Intune to deploy an up to date version of Adobe Acrobat Reader DC using the Win32 app deployment.

One of the first applications that is put on the list to distribute with Intune is Acrobat Reader DC. There are several blogs that describe how to do this, however they all use the default Adobe Acrobat Reader DC Distribution executable. Only installing this executable will get you the 2015 version 2015.07.20033, which is by now (2021) extremely out dated. This article will focus on how to deploy an up to date version of Adobe.

First you still need the default Adobe Acrobat Reader DC Distribution executable, which you can download from https://get.adobe.com/uk/reader/enterprise/ . Select your required operating system, language and version. Once you have downloaded the exe you will need to extract the contents of the exe. You do this by adding the following switches after the exe. Specify your own output location.

.\AcroRdrDC1900820071_nl_NL.exe -sfx_o"C:\InstallFiles\Blog\Extract" -sfx_ne 

Next you need to download the latest update from Adobe. Writing this blog this is the September 2021 update, which you can download from https://www.adobe.com/devnet-docs/acrobatetk/tools/ReleaseNotesDC/continuous/dccontinuoussept2021.html Download the Reader update. Make sure to choose correct bit version. In my case I need the AcroRdrDCUpd2100720091.msp file.

Place the download update in the same folder where you extracted the content of the executable. In the same folder you create two files. The first is named install.cmd and the second is called uninstall.cmd

The content of the install.cmd file is:

msiexec /i "%~dp0AcroRead.msi" ALLUSERS=1 /qn TRANSFORMS="AcroRead.mst" /Update "%~dp0AcroRdrDCUpd2100720091.msp" /norestart

Here its important that you reference the correct update file which in this case is AcroRdrDCUpd2100720091.msp.

You can use the Adobe Customization Wizard DC to further customize your Adobe installation . This will generate the mst file which is also referenced in the install.cmd file. I wont to in to detail, there are plenty of blogs which will explain this.

The contents of the uninstall.cmd file is

msiexec /x "%~dp0AcroRead.msi" /q

The content of your Adobe folder should look quite similar like this:

Test you installation by running the install.cmd and the uninstall.cmd files before continuing to the next steps.

You are now ready to put all the contents of your Adobe folder into a Win32 package and distribute it to your clients. First use the Win32 wrapper to combine all the files into a single package. If you need more information on how to do this please read this article.

  • Source folder: Is the location where all the Adobe files are located
  • Setup file: in this case it’s setup.exe
  • Output folder: location where the intunewin file is saved
  • Catalog folder: choose no

When you have your .intunewin file you can upload this to Intune and start deploying it. I won’t go in to detail but some points to take in to account:

At Program:
  • Install command: install.cmd
  • Uninstall command: uninstall.cmd
At Detection Rules use:
  • Manually configure detection rules and use the Registry Rule type:
  • Key Path: HKEY_LOCAL_MACHINE\SOFTWARE\WOW6432Node\Microsoft\Windows\CurrentVersion\Uninstall\{AC76BA86-7AD7-1043-7B44-AC0F074E4100}
  • Value Name: DisplayVersion
  • Detection method: String Comparison
  • Operator: Equals
  • Value: 21.007.20091 (or whatever version you install)

Hope this article gives you some more information on how to deploy an up to date version of Adobe Acrobat Reader with Intune.

Win32 Application Supersedence

HOW TO: Update Win32 apps with Endpoint Manager

Updating Win32 applications with Endpoint Manger is a cumbersome task.  Newer versions of applications wont install if a previous versions of the application is present on the device. The first step is to remove the application from the device and then creating a new deployment. This could result that the user isn’t able to use a particular application since the admin had to wait for the uninstall deployment to complete. Or maybe you created some custom installation which would remove the application and then install the newer version of that application. Either way the process was not easy..

Microsoft has now introduced a new function called Win32 app Supersedence, which enables you to easily update or supersede newer applications. This article will describe the new functionality and how to use it in your environment. At the moment of writing this article the functionality is still in preview, so it might be subject to change.

Scenario

Let’s say you have deployed the Citrix Receiver application via a Win32 Endpoint Manager deployment. The Citrix Receiver applications is being replaced by the new Citrix Workspace application and you need to deploy the Citrix Workspace application to the devices which are being managed by Endpoint Manger.

Initial Deployment

For the initial deployment an IntuneWin package was created (if you’re interested in how to create one view this article) and deployed via Endpoint Manger. The applications were successfully installed on all the clients.

One topic that has now become more important is the ability to know what version is installed. How can one identity which version that is active on the client. The key in this whole process is the ability to identify an unique value that determines the version of the application. Maybe the version number can be found within the name of the .exe or can the version be found in the registry. For Citrix the version can be found in the registry. In the path Computer\HKEY_LOCAL_MACHINE\SOFTWARE\WOW6432Node\Citrix\InstallDetect\{A9852000-047D-11DD-95FF-0800200C9A66} there is the value DisplayVersion which holds the value of the installed Citrix Receiver. This value can be used in the Detection rules to validate whether or not the application is installed. So when deploying your applications put some extra time in detecting the version of your application, which will make your life easier in the long run. How to use these detections rules I will show later on.

Supersedence

You have created a new package for the Citrix Workspace application and are ready to deploy the package via Endpoint Manger. Go to Endpoint.microsoft.com >Choose Apps > Windows > Add > For app type select Windows app (Win32)

Select your new package and fill out the necessary app information.

At the program settings fill in your install and uninstall commands. Make sure the also the uninstall command works as expected. This uninstall command can be used by the Supersedence functionality depending on your update strategy. I will explain this behavior later on in this article.

The detection rules are used to determine if an application is installed. As mentioned earlier it would be wise to use a value that the unique for the application and the version of that application. If there is no distinct difference between the two versions Endpoint Manger won’t be able to determine which application to install. For this article I’m using the registry detection rule.

  • Key path: Computer\HKEY_LOCAL_MACHINE\SOFTWARE\WOW6432Node\Citrix\InstallDetect\{A9852000-047D-11DD-95FF-0800200C9A66}
  • Value name: DisplayVersion
  • Detection Method: String comparison
  • Operator: Equals
  • Value: 19.9.0.21

We will skip the Dependencies tab and go straight to the new Supersedence tab. Here you will be able to select the application that is being superseded by the new application. In our case this is the Citrix receiver version 14.12.0.18020.

600

You now have the option to select yes or no at the Uninstall previous version. When to use what option? When you choose to uninstall the previous application Endpoint Manger will use the uninstall command configured in your Endpoint Manger Deployed, in the example uninstall.cmd. This option can be used if you completely replace the application with a new application, let’s say Citrix Receiver with the Windows Virtual Desktop client. Or you can use the uninstall feature to completely reconfigure the new application. In the Supersedence configuration this option is referred as Replace. If you enabled toast notifications the user will also be informed that the application is begin uninstalled and the new application is begin installed.

If you chose not to uninstall the application Endpoint Manger will try to update the application with the newer version. For this to function the application installer needs to be able to update from an older version. This way any configured settings should be honored as long as the application support this. In the Supersedence configuration this option is referred as Update. If you enabled toast notifications the user will also be informed that the application is begin updated and the new application is begin installed.

What option to choose really depends on your application. In many cases updating the application would be preferable, but replacing the applications can also have its advantages. As always the answer would be, it depends. So make sure to test and validate before going into production with the new application.

More information

Endpoint Manager and Windows Defender Application Guard

HOW TO: Deploy Windows Defender Application Guard with Endpoint Manager

In part 2 of the series, I will be taking a closer look at Windows Defender Application Guard (WDAG), specifically for Edge. Not to confused with Windows Defender Application Control (WDAC). Essentially WDAG runs application in a virtualized environment on your Windows 10 device. This way the operating system is protected from any applications that try to interfere with the system.

For Edge, WDAG helps to isolate untrusted websites. By isolating browsers users can safely browse the web without having to worry that they accidently end up on a site that they are not supposed to be on. This isolation happens within a Hyper-V-enabled container. This container is separate from the host operating system. Meaning that if a website turns out to be malicious the host device is protected, and the attacker cannot get the data.

Today this article is about Edge, more specifically the new Chromium version, but these same settings also work for the older Edge and even Internet Explorer. This level of isolation is also available for Microsoft Office, but this will not be covered today.

Other articles in the series:

  1. Windows Defender Application Control
  2. Windows Defender Application Guard
  3. Windows Defender Credential Guard
  4. Windows Defender Device Guard

Prerequisites

  1. A physical test client (64-bit, Virtualization options, minimum of 8GB), joined and enrolled in Endpoint Manager
  2. Windows 10 Enterprise currently supported version
  3. Microsoft subscription with Endpoint Manager

Enable Windows Defender Application Guard

To enable WDAG go to endpoint.microsoft.com, select Devices > Configuration Profiles > New Profile and select Windows 10 and later. For profile select Endpoint Protection.

Fill out the basic information and continue to the next step. Select Microsoft Defender Application Guard to reveal the options. I have applied the following settings, tailor them to your need if needed. In the link you can find the explication of all these settings. If you want to provide a nice experience for your users make sure to enable retain user generated browser data. This way cookies and preferences are saved. Finally apply the policy to a group.

Network boundaries

The next question is how to control what sites are blocked and what site are considered as trusted. The documentation of Microsoft is not particularly clear on this point, but is hidden way in one of the lines of text. Within Endpoint manager you have the options to create a Configuration Profile specifically for network boundaries.

To create a profile go to Devices > Configuration Profiles > New Profile and select Windows 10 and later. For profile select Network boundary. Depending on what you want to whitelist there are special rules and formats you need to apply by.  Also take into account if you want to use wildcards or specific domains. See the explication of Microsoft how to whitelist certain domains. See the explination on how to whitelist domains:

ValueNumbers of dots to the leftMeaning
contoso.com0Trust only the literal value of contoso.com.
www.contoso.com0Trust only the literal value of www.contoso.com.
.contoso.com1Trust any domain that ends with the text contoso.com. Matching sites include spearphishingcontoso.com, contoso.com, and www.contoso.com.
..contoso.com2Trust all levels of the domain hierarchy that are to the left of the dot. Matching sites include shop.contoso.com, us.shop.contoso.com, www.us.shop.contoso.com, but NOT contoso.com itself.

Here are some boundaries that I have added for this article. Most of the resources are Microsoft cloud services, but of course I also added my own website as a safe website.

Network boundary
Cloud Resourcesportal.office.com|tasks.office.com|protection.office.com|meet.lync.com|teams.microsoft.com
Cloud Resourcesoutlook.office.com|outlook.office365.com|portal.office.com
Cloud Resources/*AppCompat*/
Cloud Resourcescontoso.sharepoint.com| contoso-my.sharepoint.com| contoso-files.sharepoint.com
Neutral Resourceslogin.windows.net,login.microsoftonline.com
Neutral Resources.stephanvdkruis.com,.microsoft.com

Final result:

So now you configured WDAG, but what is happening on the background? By enabling WDAG the Windows Defender Application Guard feature is installed on the client. This installation requires a restart so the next time a user turns off its device the feature will be installed. After the feature is live users can start their browser and at first nothing is different then what they are used to. If they immediately start their browser, they might see an initialization popup meaning that the container is being provisioned.

They can go to any trusted site or cloud resources that have been defined as trusted in the boundary policy. However as soon as they try to go to an untrusted website a secure isolated browser is started. See the example below when we browse to google.com.

Endpoint Manager Win32 App Deployment (MSI and EXE)

HOW TO: deploy Win32 application using Endpoint Manager.

With Endpoint Manger you can deploy a variety of different applications to Windows clients.  I have made blog posts about using MSIX packages to provide a modern way to distribute applications. Sometimes MSIX might not be the right solution for you. This blog is about deploying Win32 applications using the Windows App (Win32) capabilities. This form of distributing gives you a lot of control on how and when an application should be installed.

A note of caution, if you start to use Windows App (Win32) app deployment for your environment it is highly recommended that you do not combine Windows App (Win32) with Line-of-Buisiness app installations. Especially if you are planning to use Microsoft Autopilot, the combination of Win32 apps and Line-of-Business apps will cause installations to fail. So, if you decide to use Windows App (Win32), use it for all your applications.

Before you can upload a Win32  application to Endpoint Manager you will need to prepare the application. Essentially you repackage the application and all the dependent files into an .IntuneWin package, which can then be uploaded to Endpoint Manger. To package an application you will need to download the Win32 Content Prep Tool from GitHub.

You will then need to gather all required media to install the application and place them into one folder. I have created two examples, one for .exe applications and one for .msi application. For both types of installations, it is recommended to create two batch files, one for installation and one for the uninstallation. This will provide better control when deploying the application.

For the Citrix Workspace, which is an .exe I have created the following batch files: install.cmd and uninstall.cmd and placed them in a folder togheter with the exe installation file.

Install.cmd:

@ECHO OFF
PUSHD "%~dp0"
"CitrixWorkspaceApp.exe" /silent /noreboot /forceinstall

uninstall.cmd

@ECHO OFF
PUSHD "%~dp0"
"CitrixWorkspaceApp.exe" /silent /uninstall
Citrix Workspace package content

For Acrobat Reader, which is an .msi I have also created the following batch files: install.cmd and uninstall.cmd. These files are added to the installation files.

msiexec /i "%~dp0AcroRead.msi" ALLUSERS=1 /qn /norestart
msiexec /x "%~dp0AcroRead.msi" /q
Acrobat Reader package content

Once you have gathered all the necessary installation media and you have validated that your batch files are working, by running the install.cmd and uninstall.cmd files you are ready to package. To package the applications run IntuneWinAppUtil.exe from an elevated PowerShell prompt. You are prompted for the source folder, which is the folder that contains all the installation files. The setup file is the actual executable and you need to specify an output folder where the .IntuneWin  file will be saved. At this point we do not need a Catalog folder. After the Utillity is ready you will end up with an .IntuneWin file.

Endpoint Manager

Now its time to distribute the application using Endpoint Manger. Login to endpoint.microsoft.com and select Apps and all Apps to Add a new application. Make sure to choose Windows app (Win32) as an app type. The first step is to select your .IntuneWin file and to provide information about the application. I will first start with Citrix Workspace and then add Acrobat Reader.

Application information

The second step specifies how to install the application. For the install and uninstall commands you will need to enter the batch files you created in the beginning. In my case the Install command is install.cmd and the uninstall command is uninstall.cmd. For installation behavior you can choose between system and user. This will determine where the application will be installed, either in the system context or in the user profile, this depends on your application.

Application installation controls

Choosing a restart behavior after the application is installed. Of course, this all depends on your application and whether it requires a reboot. Depending on your needs the following actions are explained:

Determine behavior based on return codes – The device will restart bases on the configured return code.
No specific action – Will suppress a restart during the installation of Win32 apps.
App install may force a device restart – This option means that the Win32 app installation can complete without suppressing restarts. With this configuration a Hard reboot return code will notify the user that a restart of the device will be triggered in 120 minutes. A Soft reboot return code will notify the user that a restart is required to finish the installation.
Intune will force a mandatory device restart – After a successful Win32 app installation the device will be rebooted immediately with no notification.

You get several default return codes. In most cases these return codes will work for you application . . The code configures the post-installation behavior of the Win32 app. If your application uses different access codes, you can use them here. The actions are explained:

Failed – The Failed return code indicates that the Win32 app installation failed.
Hard reboot – The Hard reboot return code indicates that the device is required to restart to complete the installation. Additional Win32 apps cannot be installed on the device without restart. The user will be notified about the required restart.
Soft reboot – The Soft reboot return code indicates that the next Win32 app can be installed without requiring a restart, but a restart is necessary to complete the installation of the installed Win32 app. The user will be notified about the restart.
Retry – The Retry return code indicates that the Win32 app installation is retried three times. The installation will wait for 5 minutes between each attempt.
Success – The Success return code indicates the Win32 app installation was successful.

The third step in the process is to specify the requirements. For the most part these are self-explanatory. You can however use custom requirement types such as specific files, registry settings or even scripts to determine whether an application should be installed or not. I will not be going into detail in this blog. For now, I only choose to install on 64-bit machines with a minimum operating system of Windows 10 1903.

Installation requirements

The fourth step are the detection rules. The detection rules are used to check if the application is present on the device. If the rules are not met Endpoint Manager will try to install the application on the device.

For .exe installations you might decide to just validate if the application is present. In my case I just check if SelfService.exe is present, in the path C:\Program Files (x86)\Citrix\ICA Client\SelfServicePlugin\.

EXE Application detection rule

The fifth step is to create dependency rules. Software dependencies are applications that must be installed before this application can be installed.  Specifically, the device must install the dependent apps before it installs the Win32 app. You can add Win32 app dependencies only after your Win32 app has been added and uploaded to Intune. After your Win32 app has been added, you will see the Dependencies option on the pane for your Win32 app. Any Win32 app dependency needs to also be a Win32 app. It does not support depending on other app types, such as single MSI LOB apps or Microsoft Store apps.

Since this is the first Win 32 app there is no option to create any dependencies. After Citrix Workspace is added a dependency will be created with Acrobat Reader. So, I just select next and I assign the application to a user group, as required.

For Acrobat Reader the steps are the same with a few exceptions. For the detection rules I will use a MSI rule type instead of a file location. Normally the MSI product code is filled in automatically. If this is not the case, you can check your registry settings. For 64-bit machines browse to HKLM\SOFTWARE\WOW6432Node\Microsoft\Windows\CurrentVersion\Uninstall. Here you will find an overview of all the installed applications. In my case for Acrobat Reader I can find the MSI GUID.

MSI application detection rule
Find the MSI GUID in the Registry settings

Since Citrix Workspace has been added to Endpoint Manger this can be used as a dependency. Acrobat Reader and Citrix are do not require each other to function, this is purely for demonstration purposes. To add a dependency simply select to add a dependency and select the application, in this case CitrixWorkspace.exe. By creating dependencies means that before Acrobat Reader is installed the Citrix Workspace application must be present. If Citrix Workspace is not present Endpoint Manager will install it first.

Application dependencies

Now the configuration is ready, and the applications start deploying to the clients. What happens on the client? Well first the Intune Management Extensions is installed on the client. This extension is used for the installation as well as the deployment of custom PowerShell scripts on devices. You can use the extension for troubleshooting purposes. The log file IntuneManagementExtension.log can be found in C:\ProgramData\Microsoft\IntuneManagementExtension\Logs.

User notification